 When you initially execute the PL-TERM program, you are presented with a blank "Desktop" and a menu-bar.
(C) Copyright 1990-1998 Modular Software Corporation. All rights reserved. Version 2.0.0.17 - February 28, 1998
   Goto:  Table of Contents   Index
Chapter:  1 2 3 4 5 6 7 8 9 10 11 12 13 14
PL-TERM
The terminal emulator will begin execution. The terminal emulator itself uses the PL-CFG.INI file for information about the type of display adapter that your system has, the mode to operate your system display in, and information about your installation of the PicLan networking software. If the PL-TERM program does not correctly drive your terminal's display, or does not communicate over the network, check the setting in the PL-CFG.INI file to insure that they are correct for your installation. The PL-CFG.INI file has comments in it which explain the variables which may be set using the file.
The MDI interface specification provides for standardized methods of managing display areas for multiple "documents" within a single "parent" display area. In the case of PL-TERM, these multiple "documents" represent multiple terminal sessions and the "parent" display area is the entire screen display. This generalized Multiple Document Interface allows the user to quickly build a screen layout for one or several terminal sessions that provides for maximum functionality as they use the emulator. Of course, users that need simpler interface specifications, such as a single full-screen connection, can create layouts for this situation also.
 When you initially execute the PL-TERM program, you are presented with a blank "Desktop" and a menu-bar.
The main feature of the Multiple Document Interface is that the program's pull-down menus change based on the status of each "document". For example, within PL-TERM.EXE, options for opening, connecting, disconnecting, and closing sessions only appear on the menus when those options may actually be chosen. (It doesn't make sense to disconnect a session which isn't connected.)
The "Window" menu has entries which allow you to switch between sessions. You can also use the mouse to click on the session you wish to activate. Each session has its own "system menu", allowing you to move, size, and close the window.
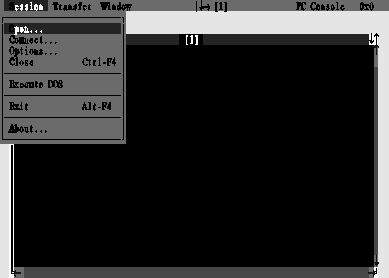 The Session Menu is used to Open, Close, Connect, and Disconnect "sessions". It is also used to exit the terminal emulator back to DOS as well as shell to a DOS command prompt.
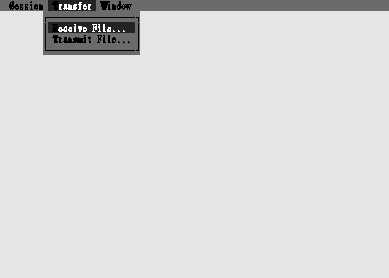 The Transfer Menu is used to transfer files between Pick and DOS. Transfers are only supported to and from PicLan-equipped Pick hosts which are running the PicLan SERVER-PROCESS. File transfer over async lines is not supported. It is not necessary to have a terminal session with a Pick host just to do file transfer - file transfer and terminal sessions are separate..
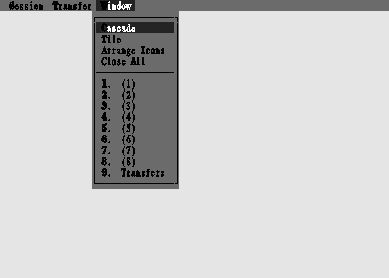 The Window Menu is used to select and arrange multiple client-area windows (terminal sessions) on the display screen
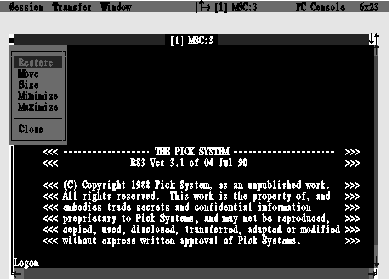 Each open "document window" on the desktop has a "document system menu". This menu is accessed by typing <ALT>-<MINUS> (or by clicking on the system menu icon with a mouse), and provides commands for changing the position and size of the window.. The "Restore" selection causes a minimized or maximized window to be returned to its previous size. The "Move" and "Size" selections allow the window to be moved and sized from the keyboard. The "Maximize" selection zooms the window to occupy the entire desktop, while the "Minimize" selection shrinks the window to an icon. Finally, the "Close" selection closes the window.
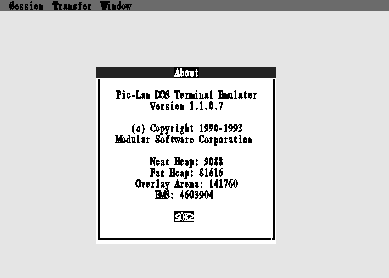 The About Dialog box displays the copyright information and current version information for the PL-TERM program.
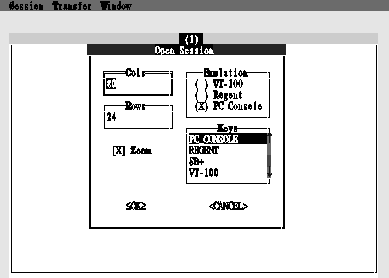 The Open Session Dialog Box is used to establish a terminal emulation session. It does not connect the session to a Pick system - the Connect Session Dialog Box actually makes the connection between the PL-TERM program and a Pick host system.
The Open Session Dialog Box includes settings to establish the terminal emulator's virtual screen size, the emulation mode and keyboard setup that is to be established, and whether or not the emulation session is to be created "maximized" or full-screen.
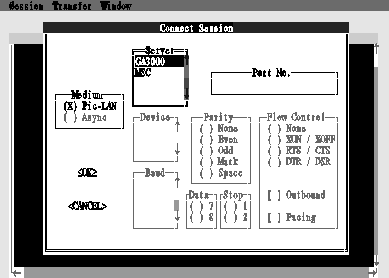 The Connect Session Dialog Box is used to actually connect a terminal emulation session to a Pick host port. PL-TERM sessions may connect via either async or PicLan connections. The default connection type is PicLan. If you wish to make an async connection, check the async box in the Connect Session Dialog Box.
Making a PicLan connection involves setting the desired Pick host system and then optionally entering a list of desired ports. If the list is left blank, the emulator will attempt to connect to any open port on the Pick host. If a list is provided, the emulator will try each listed port in turn, until a connection is made or they are all exhausted. If the specified system is not available or the requested port is not available, an appropriate error message will be displayed.
Making an async connection involves selecting the desired async device, baud rate, parity, data bits, stop bits, flow control, and other communications parameters. The only two controls needing explanation for async connections are the "Outbound" and "Pacing" checkboxes in the "Flow Control" section: checking the "Outbound" checkbox instructs the emulator to use flow control signals from the remote system to slow-down its outbound text - this option is usually left unchecked, since few Pick hosts send flow control signals (and since some combinations of outbound flow control and emulation sequences are in conflict); checking the "Pacing" checkbox instructs the emulator to transmit characters as a slower rate than normal - this should be used in cases where the Pick host is not able to accept inbound characters at a high rate. [This version of the PicLan DOS Terminal Emulator does not yet implement async character pacing - the checkbox is always disabled, and may not be checked.] Finally, it should be noted that the PL-TERM program is a simple terminal emulator, intended mainly for establishing PicLan network connections. It does not include functions such as dialing directories (although you may use some modems by typing the AT... modem commands during the terminal emulation session).
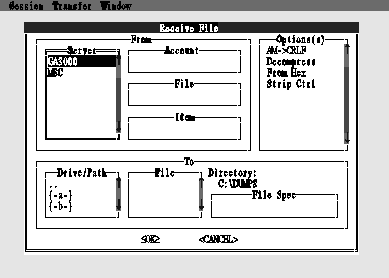 The PL-TERM program can be used to download a Pick item into a DOS data file. This download process occurs independently of any terminal session and as such does not require that the user be logged on to the Pick system or use a Pick port. The file transfer function does require that the PicLan SERVER-PROCESS be executing on the Pick host system. File transfer functions are not available over async lines.
To download a Pick item to a DOS file, select the Receive selection on the Transfers menu and fill in the required information in the Receive File Dialog Box. To cancel the transfer once it is in progress, simply close the transfer status window - you will be prompted as to whether the file transfers should be aborted.
The PL-TERM file transfer functions are functionally identical, and use the same operational software, as the DOS PL-COPY.EXE stand-alone file transfer function. Most users find the PL-COPY function easier to use than initiating transfers from within PL-TERM.
When transferring data from Pick to DOS, you need to supply the following information to the Receive File Dialog Box:
    FILE
    DICT FILE
    FILE,FILE
    MD
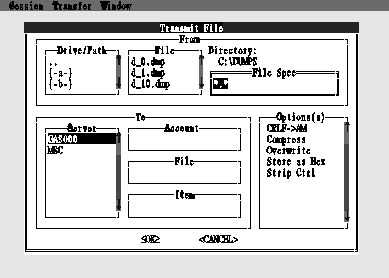 The PL-TERM program can be used to upload a DOS file into Pick. The upload process occurs independently of any terminal session and as such does not require that the user be logged on to the Pick system or use a Pick port. The file transfer function does require that the PicLan SERVER-PROCESS be executing on the Pick host system. File transfer functions are not available over async lines.
To upload a DOS file into Pick, select the Transmit selection on the Transfers menu and fill in the required information in the Transmit File Dialog Box. To cancel the transfer once it is in progress, simply close the transfer status window - you will be prompted as to whether the file transfers should be aborted.
The PL-TERM file transfer functions are functionally identical, and use the same operational software, as the DOS PL-COPY.EXE stand-alone file transfer function. Most users find the PL-COPY function easier to use than initiating transfers from within PL-TERM.
When transferring data from Pick to DOS, you need to supply the following information to the Receive File Dialog Box:
    FILE
    DICT FILE
    FILE,FILE
    MD
It is possible to make all menu and dialog selections using either a mouse or the keyboard. For some operations, such as sizing windows, a mouse is easier. For other operations, the keyboard is easier.
Menus can be activated from the keyboard by pressing <alt>KEY for the highlighted letter of the menu. (For example, Alt-S activates the Session menu.) Individual menu selections may be made by pressing either the highlighted letter or by using the cursor keys to move the highlight-bar to the desired selection and then pressing <RETURN>.
Dialog Boxes may be used from the keyboard in much the same way as menus. Use the cursor keys to move between radio buttons in a group and <alt>KEY keys to quickly move between active groupings. You can also use the TAB and BACK-TAB ( <shift>TAB ) keys to move forward and backward between control groups. In Dialog Boxes, the ENTER key is always the same as selecting the <OK> selection and the ESC key is always the same as selecting the <CANCEL> selection.
The PicLan DOS Terminal Emulator allows you to create terminal sessions which are larger than the area that is displayed on the screen. These terminal emulation "portholes" allow you to, for example, display 132x60 reports on PC display screens that only support 80x25 text-mode displays. You "scroll" though the display area either by using the mouse with the scroll-bars on the window's borders, or by using keyboard commands. These keyboard commands are only available when the <SCROLL LOCK> key is active. The following keyboard commands are available:
To activate the system menu for a particular dialog box area, press <Alt><Minus>.
To exit the terminal emulator entirely, press <Alt><F4>.
To send a <BREAK> signal over a terminal session, type <Ctrl><BREAK>.
To activate a particular window, type <Alt><num>, where num is the window number. (For example, typing <Alt><3> will activate window number 3.)
As an extension to the standard terminal emulation sequences, new sequences are available that allow the execution of DOS commands under control of the Pick host application. For a complete list of these sequences, refer to the appendix on terminal emulation sequences at the end of this manual.
For you convenience, there is a TCL command named DOS which can be used to execute DOS commands in conjunction with the PicLan terminal emulator. The syntax of this verb is:
DOS dos_command {(N}
The 'N' option is used to suppress the "press any key" prompt when the command completes.
The PicLan terminal emulator can also capture data directly to DOS files or devices. Refer to the appendix on terminal emulation sequences for more information on these functions.
All of the configurations for PLT.EXE must be setup before running it - there are no menus or key sequences that can be used within PLT.EXE to changes its configuration. For configuration information, PLT.EXE first reads the PL-CFG.INI file, then parses the PLT_OPT environment variable, and finally parses its command line - in this way, environment variable options can override configuration file options, and command line options can override both environment variable and configuration file options.
In PL-CFG.INI, the following fields are meaningful to PLT.EXE:
    [General]
    DefCols
    DefRows
    DefEmulation
    BellLength
    BellTone
    DefHost
    [System]
    UseEMS
    UseXMS
    PanHorz
    PanVert
    BufsPerSession
    [Ports]
    ...all...
    [Function Keys]
    ...all...
    [... Keyset]
    ...all...
In both the environment variable PLT_OPT and on the command line, the following syntax is recognized:
    set PLT_OPT=host port... /flag...
    PLT host port... /flag...
(or some combination of the above) where
    "host" is optionally the server to connect to
    "port..." is optionally a list of ports
    "/flag..." is optionally one or more of
    /NOSTATUS - disable the status display line
    /NOXMS - disable use of XMS memory
    /NOEMS - disable use of EMS memory
    /NOREAL - disable use of real memory
    /NOEXIT - disable keyboard sequence to exit emulator
    /? or /HELP - give this help
Note that in environments with multiple Pick hosts, you must specify the name of the Pick host you wish to attach to - if you don't specify a Pick host (either on the command line, or in the PLT_OPT environment variable, or in the DefHost setting in the [General] section of PL-CFG.INI) and PLT.EXE finds multiple hosts, it will print an error message and terminate without establishing any connection.Also note that PLT.EXE requires that PL-DEV.EXE be loaded - unlike PL-TERM.EXE, it does not include the PicLan device support layer in its own executable.
PL-COPY source_file dest_file {-options}
The source and destination file spec parameters specify either the DOS file name or the Pick item location. For a DOS file name, the specification is:
{d:}{path\}name.ext
For a Pick item location, the specification is:
system_name!acct_name!file_name!item_id
The PL-COPY.EXE program can be used to copy data from Pick to DOS or DOS to Pick. Pick to Pick and DOS to DOS copy functions are not supported in the current release of PL-COPY.
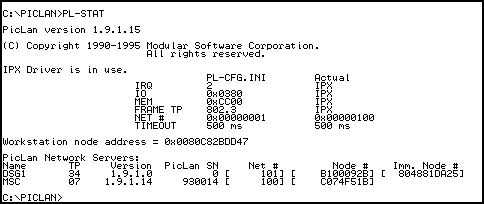
PL-DEV.EXE accepts up to three options on its command line:
PL-DEV /u /noems /noxms /nodoshigh /noprn /noipx /nopci /noapkt /noepkt /noenet /i /?
When no options are specified, PL-DEV.EXE will be loaded into memory. The following options are available:
PL-DEV looks for one of several possible network driver layers in determining what support to load. PL-DEV will search for drivers in the following order:
The PL-PRN.EXE DOS program is used to re-direct printer output from a DOS workstation to the Pick spooler.
This program is used to "re-direct" printer output directed at LPT1 (or PRN), LPT2, or LPT3 and transfer them to the Pick spooler. The PL-PRN.EXE program is no longer implemented as a TSR (Terminate Stay Resident) DOS program but instead is used to configure the printer support code within PL-DEV to re-direct local printer output to a Pick system's spooler. In order to use PL-PRN.EXE, you must setup the following elements.
PL-PRN lpt#:={server!form_queue} /copy_count /h /s /t## /u /i /n /f /?
The PL-PRN.EXE program may be executed several times to re-direct all three LPTn: printer connections if desired.The "lpt#:=server!form_queue" portion of the PL-PRN.EXE command-line syntax is used to re-direct the specified local printer "port" to the specified PicLan Pick host server system using the specified form_queue. The /copy_count, /h, and /s options are use to assign a Pick copy count, H, and S option to the generated print job.
The /t## parameter is used to specify the timeout value that is to be used to close a print job. Because the PL-PRN.EXE program intercepts DOS print jobs at a very low level within DOS, the only manner that it can use to determine when a DOS print job is finished is to look for a timeout in the data stream. The default timeout value is 30 seconds, meaning that a pause in the generation of the print job of 30 seconds will result in the job being closed and transferred to Pick. 30 seconds is a quite paranoid setting for the job close timeout value and many users will find much shorter values (like 5 seconds) more useful with most applications.
The /u option is used to unload the PL-PRN.EXE TSR from memory. This will also flush all outstanding print jobs to the Pick host system(s) and then return the lpt# devices to their original statuses.
The /i option is used to display information about the re-direction parameters that are currently in effect.
The /n option disables automatic sensing of DOS end of jobs.
The /f option is used to flush a print job (ie. close the print job). It is also used to re-establish a print re-direction connection should a network error occur.
The /? option prints help text for PL-PRN.EXE.
PL-SPRN is used to configure up to two (a primary and a secondary) slave printer. Slave printers can have print jobs directed to them from the PicLan SERVER-PROCESS background task. For information of setting up PicLan slave and routed printer support under Pick, refer to that section of this manual.
The format of PL-SPRN is:
PL-SPRN LPT#:=PRIMARY /p## /t## /i /?
PL-SPRN LPT#:=SECONDARY /p## /t## /i /?
The /p## option sets the character polling period for the printer port, and is specified in milliseconds. During each hardware timer tick (which happens 18.2 times per second), PL-SPRN.EXE will attempt to print any data which has been received from the Pick host. For each individual character, if the character cannot be printed within the character polling period, no further characters will be printed during the timer tick - the printer is assumed to be busy printing. The ideal setting for this option would be to set it as close as possible to the amount of time required for the printer port to acknowledge receipt of a single character (and allowing a margin for the amount of time it takes to request the printer status using INT 17H). This option is provided for tuning purposes, and should be used with discretion. The default value is 1 millisecond.
The /t## option sets the maximum output timeout for the printer port, and is specified in milliseconds. During each hardware timer tick (which occur 18.2 times per second), only the maximum output timeout period will be used to output characters to the printer, regardless of the printer's ability to accept additional characters. This option is a tradeoff between the amount of time during which foreground applications may run, and the output speed of the printer. It is provided for tuning purposes, and should be used with discretion. The default value is 27 milliseconds (half a timer tick).
Both the /p## and /t## values may be specified as fractional numbers (i.e. it is legal to specify /p0.5). For actual timing purposes, PL-SPRN.EXE reads the countdown value in the hardware timer chip in the system (the "sub-tick"). On ISA machines this timing method has a theoretical resolution of approx. 0.0008 milliseconds (0.8 microseconds), while on MCA machines the theoretical resolution is approx. 0.0016 milliseconds (1.6 microseconds). On both architectures, it takes longer than the theoretical timer resolution to even find out if the printer is able to accept another character - minor changes in the settings of /p## and /t## are not likely to be noticeable. As mentioned above, the /p## and /t## options are provided for tuning purposes - for example, the system administrator might use these options to tune system performance in cases where several high-speed printers are being driven by PL-SPRN.EXE. They should be used with caution, since some combinations may result in very bad printer performance, while other combinations may result in the DOS machine dragging to a halt while printing is in progress (which isn't a problem if the DOS machine isn't being used for anything else). The /p## and /t## are implemented in a manner that is similar to the SETPTR command in R83 and AP/Native.
The /i option will display information about current slave printer assignments.
Note that because of the low-level hardware accesses made for timing purposes, slave and routed printing functions may fail to run properly on machines which vary from the IBM PC "standard".
It is possible, although not recommended, to use PL-SPRN to direct print jobs to printers that are actually set up as network printers. An example of doing this would be to direct slave printer output to an LPT device that had a NetWare CAPTURE command active. While this does work in many cases, there are some potential problems:
   Goto:  Table of Contents   Index
Chapter:  1 2 3 4 5 6 7 8 9 10 11 12 13 14