(C) Copyright 1990-1998 Modular Software Corporation. All rights reserved. Version 2.0.0.17 - February 28, 1998
   Goto:  Table of Contents   Index
Chapter:  1 2 3 4 5 6 7 8 9 10 11 12 13 14
PicLan may be installed into either a stand-alone PicLan Ethernet network installation or may be installed in conjunction with Novell NetWare or other IPX protocol supporting network. The presence of NetWare and other network components affects how you install and configure both the PicLan hardware and software.
The previous section on network configuration should be used to design the configuration of your network installation. Pay particular attention to limitations as to placement of Pick host systems and requirements for network hardware for Pick host and DOS workstation systems.
NE2000 style adapters use an I/O address range and an IRQ setting. Both of these values must be setup on the adapter and in software. Legal I/O address values are:
If your network adapter is addressable to I/O 380, this is the preferred address to use. With the exception of some sound cards, I/O 380 appears to not conflict with any other peripherals. If you adapter is not configurable to I/O address 380, you should try I/O address 300 and 320 next, paying attention to conflicts with Pick SCT tape controllers.
NE2000 style network adapters also use an IRQ setting. Most adapters can be configured to the following IRQ settings:
WD/CPX style adapters also use a shared memory range to transfer data to and from the network adapter across the ISA bus. NE2000 adapters do not use a shared memory range. The shared memory address is setup completely within the PicLan software and you do not need to set any jumpers or run configuration programs to setup the card shared memory range. 8-bit WD8003 adapters use an 8K range. 16-bit WD8013 adapters use a 16K range. Compex adapters (both 8 and 16-bit) use an 8K range. You can set the range to any value provided that other adapters are not also using the same shared memory range and provided that the system motherboard allows the specified address range to be mapped across the ISA bus.
A good default address for the shared memory address is DC00. This is an address at the top of the range typically mapped across the ISA bus and allows for a 16K window. You should not need to change this address unless you have another adapter installed that conflicts.
Some motherboards are not compatible with shared memory cards. If you have one of these systems, you will need to install an NE2000 style adapter or jumper a Compex multi-personality adapter in NE2000 mode.
PCI adapters are "theoretically" auto configuring. The auto configuration is performed by the system CMOS and typically maps the adapter at I/O address 6000 and "snoops" the ISA bus for an available interrupt, usually in the sequence 2,10,11,15.
Some sites have reported problems using PicLan with PCI adapters where the system supports "Plug and Play" BIOS operations. If you have trouble, you may wish to disable plug and play options in the system CMOS setup. Also, if you are running some types of Pick systems, notable AP/Pro or Mentor PRO, and the system happens to map the IRQ to 11, you may have problems. You can sometimes work around these by telling the CMOS to not try to map the IRQ to 11.
The PicLan configuration program will list all possible interface specifications for each chip/board type. If the network adapter you are using is listed, you can select directly from the list. If you are using a network adapter that is not specifically listed, you may need to try several settings to see which one (if any) works with your particular adapter.
Most twisted-pair interfaces allow you to select between full and half duplex. Most networks are half duplex and setting the adapter to full duplex will reduce your network performance by causing a increase in the number of network collisions. Only networks using switching hubs exclusively are full duplex.
Common settings for PCI interface port settings in PicLan are:
The purpose in allowing PicLan network adapters to be user configurable is to allow the user to install the network card in a variety of systems and avoid potential conflicts. The following known conflicts should be considered:
Many VGA adapters allow their ROM BIOS to be operated in 16-bit or 8-bit mode. The manufacturers state that 16-bit mode is desirable in order to achieve best performance. Conflicts can arise when the VGA adapter is an 8-bit adapter (or is plugged into an 8-bit slot) and installing PicLan network interface adapters into such systems nearly always requires that the VGA adapter be set to 8-bit BIOS mode exclusively. This is true even for those adapters that sense addressing conflicts. Note that this is a fairly rare conflict, since most VGA adapters are 16-bit boards.
Pick async adapters use both I/O addressing space and IRQs. Be sure to configure PicLan networking addressing and IRQ setting to avoid any installed async cards. Most async cards use I/O addresses between 0100 and 02FF and either IRQ 3 or IRQ 4.
Some Pick releases (R83) auto-sense the presence of Async adapters. For this reason, do not install the PicLan network adapter with an I/O port address between 0100 and 02FF as this is the most common range of addresses for async adapters. If you install the PicLan network adapter within this I/O address range, unusual Pick behavior including port and system hangs may be encountered.
The standard setting for R83 and AP Pick tape controllers is IRQ 5, I/O base 0320. Some tape controllers run IRQ 5, I/O base 0300 or 0308. Be sure to configure the PicLan network adapter card to IRQ and I/O addresses that do not overlap those of the tape controller. Similar conflicts occur with Pick/64+ and UPBOARD tape and disk controllers.
Even though a Pick host system cannot actually use a mouse, many system have bus mouse adapters installed. PC bus mouse adapters use an IRQ value of 2, 3, 4, or 5. IRQ 5 is the most common value in most installations. If you have a bus mouse adapter, be sure to select a configuration that does not overlap with the bus mouse IRQ usage.
Some printer adapters use IRQ 7 for LPT1 support. If you configure PicLan to utilize IRQ 7, be sure that your LPT1 printer adapter does not use IRQ 7. Most Pick implementation do not activate the IRQ functions of parallel printer adapters, so an adapter that supports IRQ 7 does not preclude use of IRQ 7 with network adapters.
The default settings of IRQ 10, IO 380, and RAM DC00 (for WD/CPX cards) and IRQ 10 and IO 300 (for NE2000 cards) were carefully chosen to minimize conflicts. While some sites may need to change these settings, you should be conservative: only change those settings which you must change, since changing any particular setting can easily introduce a new conflict.
Workstations running Novell NetWare or other supported DOS or Windows networking software already have all of the network hardware required to run PicLan. No additional hardware installation is required.
In stand-alone PicLan networks, the DOS workstations must have a PicLan Ethernet network interface adapter installed. This adapter can be an NE2000, WD/CPX, or DEC 21x4x PCI style adapter.
Installing a PicLan network interface adapter requires that you configure the adapter in the same manner as installing the adapter into the Pick host system. You also must be conscious of the same potential addressing conflicts in the DOS workstation as in the Pick host system. In addition, because of the wide variety of DOS peripheral hardware and device-driver type software, you should also consider the following elements:
The PicLan DOS Services gateway is simply another PC DOS workstation connected on the network. It requires the same hardware as any other DOS workstation. The DOS Services Gateway may run on a NetWare non-dedicated router but performance issues may be relevant.
    SET-FLOPPY (HA)                               most systems
      or
    SET-SCT                                             GA systems
       or
    T-SELECT 0                                      PC/OS or Mentor PRO systems
      or
    SET-VTAPE a:\pic-lan.tap               UPBOARD systems

    T-REW
    T-LOAD MD (O)
    INSTALL
This PicLan INSTALL proc will execute. Answer the install proc's questions as appropriate. The install proc performs the following steps:
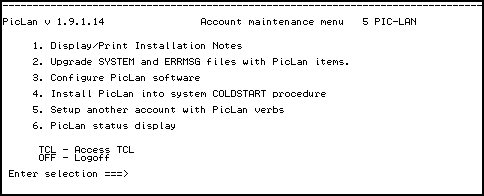
This select is mostly obsolete. PicLan release notes are now located on the DOS/Windows client diskette in Windows help file format. When you install the PicLan client files, an icon for the release notes will be created in the PicLan group.
This select re-executes the initial install function. If you restore the PIC-LAN account, you may need to re-execute this function to setup SYSTEM and ERRMSG items that an account-restore does not include.
This function is used to run the PL-CONFIGURE program. PL-CONFIGURE is used to enter PicLan license, hardware, and software settings.
This selection will display help text about how to add the PL-LOAD command to the system COLDSTART procedure. Some systems add the PL-LOAD command automatically while other require that you do this manually.
If you wish to execute PicLan function from another account, this selection will copy the necessary verbs and q-pointers to the other accounts master dictionary.
This selection executes a PL-STAT command. You can only use this selection after the PicLan PL-LOAD program has completed successfully.
This selection load the PicLan ABS code on OA platforms (AP/Native, Pick/64+, and Sequoia PRO). You must execute this selection before the PL-LOAD program will run. You need to re-execute this selection if the system ABS file becomes corrupted and you have had to re-load system ABS.

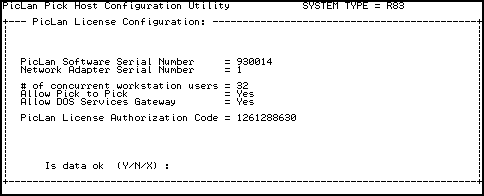 The first step is to enter the PicLan license information. AP/Pro and Mentor PRO do not have license information (the license is obtained directly from Pick or GA). In order to complete this section, you must have received a PicLan License Configuration from Modular Software Corporation. Simply enter the information from the License Configuration directly.
 Next, you will need to enter the hardware configuration for the PicLan adapter that you have installed. This information includes the driver type, parameters for the driver such as I/O address and IRQ, IPX addressing information, and network retry time values. The fields prompted for are:
If you are configuring a PicLan DOS Services Gateway and are going to run the DSG on a Windows 95 or Windows NT workstation, then you must configure the Pick host to use IPX routers even if you do not have routers present. This is because the Win95/NT systems have trouble advertising IPX services to a network that does not have a network address and frame type. In this case, you can use frame type 802.2 and network number 1. You will also need to configure the Win95/NT workstations for the same frame type and network number.
If you are configuring any type of remote access software to allow users to dial-in to your network and access your Pick host, then you must configure PicLan and your workstations and remote access devices for IPX routers. Remember that the remote access server is a router.
PicLan includes three fields that you can use to tune network error retries. Most users do not need to change the values of these field. Some of the fields are completely theoretical in nature and changing their values has not been needed at "any" sites.
 The Software Configuration section controls how the PicLan software presents services to clients on the network.
PicLan Pick host systems, because they operate in a network environment, must have a unique name by which they may be referred to. When you install the PicLan software, you will need to specify a host name for each Pick host system that you install. The following guidelines apply to naming Pick host systems.
In NetWare networks, the PicLan host system names are separate from other network names such as file-server names. You are technically allowed to use the same name for a PicLan server and for a NetWare server without conflict but this may prove confusing to some users.
In order to access Pick terminal session over the network, you must configure Pick ports that are to be used by the network. In configuring ports, keep the following guidelines in mind:
In order to use PicLan file transfer and printing functions, you must assign a single, dedicated Pick port to act as a "server-process" for the PicLan software. The PicLan server process is a Pick process that executes continuously and processes requests from a number of sources involving network file transfer and printer functions. The PicLan server process sleeps most of the time and only activates when it has work to do. Where the server-process is assigned varies from system to system. On some systems, the server-process executes on a real port. On other systems, the server-process executes on a phantom.
If the Pick host is being relocated to another segment on a NetWare network, you must use the PL-CONFIGURE verb to change the hardware assignment for Network Number. The Pick host Network Number must always match the NetWare network number for the Ethernet segment the Pick host is on.
On systems with PicLan license authorization codes, PicLan uses the node address of the installed network adapter as a hardware key. If you re-configure your Pick system's hardware, you must be sure to install the PicLan network interface adapter that matches your PicLan license configuration.
PicLan is installed on a DOS workstation by running the INSTALL.EXE program located on the first PicLan client diskette. This program will create a C:\PICLAN directory and load all of the PicLan driver and utility files into that directory. You can also optionally load NDIS and Packet-Driver support files into the C:\PICLAN\NDIS and C:\PICLAN\PACKET directories.
PicLan is installed on a Windows workstation by running the SETUP.EXE program located on the first PicLan client diskette. This program will create a C:\PICLAN directory and load all of the PicLan driver and utility files into that directory. The SETUP program will also create a PicLan group and copy some support DLL files to the Windows SYSTEM directories. After the SETUP program completes, you should execute the PL_SETUP program (available as an Icon in the PicLan group) to setup your network driver configuration.
If you have received the PicLan client in the form of a electronic download instead of on diskette, you must create DOS installation diskettes first. The PKZIP archive that you downloaded includes a README file and a utility program that will create 1.44Meg floppy disks from the files that you downloaded. This program must be run under DOS, Windows 3.1, or Windows 95 (it is not compatible with Windows NT). After you create the installation diskettes, you can run INSTALL.EXE (for DOS) or SETUP.EXE (for Windows) from the first diskette.
If you are running an underlying DOS or Windows network, you may wish to create a shared install directory that eliminates the need for diskettes at each workstation. Simply create a directory on your network that is accessible for all users. Copy the contents of all of the PicLan client diskettes into that temporary directories named ...\disk1, ..\disk2,...\disk3, and ...\disk4 and then run INSTALL.EXE or SETUP.EXE from the first directory.
When installing on a NetWare LAN, the PicLan utility files may be copied to a shared search drive on a network file server. In this case, do not place the PL-CFG.INI file in the same directory. (In fact, do not place any copy of PL-CFG.INI on any global network search drive.) Rather, each user should have a copy of PL-CFG.INI in a private directory that is on their DOS PATH - this will allow each user to have their own configuration, instead of all of the users sharing the same configuration. This type of installation is not recommended for systems running Windows as a number of shared DLLs are required and these DLLs are configured differently for different types of Windows installations
PicLan does not require any special configuration when used with NetWare IPX drivers. PicLan will operate with either newer ODI style drivers, or with older IPX.COM style drivers and is also compatible with most versions of NetWare shells including NETX and VLMs.
PicLan does not require any special configuration when used with NetWare Lite IPX drivers.
PicLan does not require any special configuration when used with third-party IPX drivers such as Spry Concurrent.
If PicLan is to directly drive an installed Ethernet adapter, you must configure the DOS workstation with:
The following types of adapters are known to NOT work with PicLan in stand-alone mode:
With NE2000 style adapters, you must set the EnetIRQ and EnetIO settings to match the adapter. You should set the EnetRAM setting to 0.
With WD style adapters, you must set the EnetIRQ, EnetIO, and EnetRAM settings.
With 21x4x style adapters, you must set the EnetMedia field. These settings use the same numbers as the PicLan host uses.
PicLan supports the Clarkson University Packet Driver specification with both Ethernet and ArcNET networks. In order to use PicLan with a packet driver, you must first install the packet driver TSR using the instruction that came with it and then load the PicLan PL-DEV driver TSR. PL-DEV will automatically locate the installed packet driver and use it.
PicLan supports multiple frame types with packet drivers, although the packet driver specification itself often does not. For this reason, you should always use Ethernet-II frames with packet driver installations and you need to set the EnetFrame field in the PL-CFG.INI file to:
EnetFrame=Ethernet-II
If you wish to verify that PicLan is using the correct driver, include the /i (information) option when you load PL-DEV as in:
PL-DEV /i
The PL-DEV program will then display the driver that is actually in use. DRV_EPKT refers to the Ethernet Packet driver and DRV_APKT refers to the ArcNET Packet driver.
A number of networks use NDIS version 2.0 network drivers on DOS workstations including:
DEVICE=DIS_PKT.DOS
    [SMCMAC]
    ...

    [PKTDRV]
    drivername = PKTDRV
    bindings = SMCMAC
    intvec = 0x61
In this example, a SMC Ethernet adapter is in use and SMCMAC refers to the MAC driver that you are using. You installation will probably use a different MAC driver name, so you should substitute this name for the 'bindings' field in the PKTDRV section.The "intvec" setting in this example specifies a software interrupt vector that the packet driver uses. If the specified vector is in use, you should specify another value between 0x60 and 0x7F.
The DIS_PKT.DOS program only supports Ethernet-II format frames, so you need to specify:
EnetFrame=Ethernet-II
in the PicLan PL-CFG.INI file.If you have configured everything correctly, you should see the message
The command completed successfully
when the NET START command executes. You should also see a copyright notice for the DIS_PKT.DOS driver as it loads. If you do not see these messages, some piece of information is missing or has been entered incorrectly in the CONFIG.SYS or PROTOCOL.INI file.After you have configured the CONFIG.SYS and PROTOCOL.INI files, you can load the PL-DEV PicLan driver TSR. If you load PL-DEV with the /i option, it should display the type of network driver you are using. NDIS installations should be using DRV_EPKT bound to the MAC/DIS converter.
PicLan runs with Windows 3.1 as a DOS hosted network. You should configure the DOS network drivers (stand-alone, Packet, NDIS, or IPX) prior to starting Windows and then load the PL-DEV program before you start Windows.
PicLan is compatible with Windows for Workgroups version 3.1 as either an NDIS 2.0 DOS client or by using the MSIPX program to create an IPX driver.
PicLan is compatible with Windows for Workgroups (WFW) version 3.11 when WFW is configured to use real-mode NDIS-2 Ethernet drivers. PicLan will not work with WFW 3.11 protected mode (NDIS-3), protected/real-mode (NDIS-3/2), or ODI Ethernet drivers.
If you network is using Novell IPX drivers (IPX.COM or IPXODI), you should not follow these installation instructions. Follow the instructions for use with IPX drivers instead.
In order to configure your workstation for PicLan and WFW support, you need to follow the following procedure:
    [network driver]
    devdir=C:\WIN
    LoadRMDrivers=Yes
    netcard=ne2000.dos
    transport=*netbeui,ndishlp.sys
netcard=ne2000.dos,dis_pkt.dos
    [PKTDRV]
    drivername=PKTDRV
    bindings=MS$NE2CLONE
    intvec=0x61
    A copyright message for your network adapter driver.
    A copyright message for the MAC/DIS converter (DIS_PKT.DOS)
    The message `The command completed successfully'.
PicLan runs with Windows 95 either as a Windows 3.1 client with real-mode IPX drivers (Novell IPX.COM or IPXODI.COM) or with 32-bit drivers using the NDIS IPXSPX stack that is built into Windows 95 or included with the Novell Client-32. The PicLan Windows 95 client allows you to choose between the following client driver types:
You can install Windows 95 as a Windows 3.1 client with real-mode IPX drivers (usually older NetWare IPX.COM or IPXODI drivers). You then load the PicLan PL-DEV TSR program in AUTOEXEC.BAT. This installation method is not recommended for most installations and prevents 32-bit PicLan client programs from functioning.
This is the default configuration for a Windows 95 workstation. By using IPX calls that are available in the Microsoft supplies WSOCK32.DLL (this is the 32-bit Winsock support DLL), PicLan can use IPX services directly from multi-threaded 32-bit applications. You should use this configuration unless you are using Novell's Client-32 requestor.
WS2_32.DLL is a new Microsoft supplied interface that supports the new Winsock 2 interface specification. This DLL is not available on Windows 95, but should be available on Windows 98. Support for this interface is included in PicLan primarily for Windows NT clients, but should also work with Win98.
The NWSIPX32.DLL can be used as an IPX interface for clients that are running Client-32 for Windows 95. If you are running Client-32, you should use this option, although the WSOCK32.DLL option also works in most cases. If you are running Client-32 with the Novell IPX/IP or IP/IP gateway installed, then you must use the NWSIPX32.DLL option.
Windows NT is configured nearly identically to Windows 95 with the exception of not having real-mode IPX stacks available.
In order to use the PicLan utility programs, you must first configure these programs for operation on the network. In general, this configuration process involves customizing the PL-CFG.INI file.
PL-CFG.INI
The PL-CFG.INI file is a normal DOS text file which contains the configuration information for the PicLan DOS Terminal Emulator, Pick to DOS copy functions, etc. It can be changed by using any text editor to edit it. DOS EDIT or Windows NOTEPAD are preferred editors for editing this file (If a word processor is used to edit PL-CFG.INI, be sure to save the file as text only, without any formatting information.)If you wish to use a file with a name other than PL-CFG.INI, you can use the environment variable "PL-CFG.INI" to specify the name. For example, the DOS command
set pl-cfg.ini=c:\etc\my_plcfg.ini
will cause the file MY_PLCFG.INI, located in C:\ETC, to be used. (When setting the "PL-CFG.INI" environment variable, be careful not to include any spaces on the command line on either side of the equal symbol.) Consult your DOS documentation for information on environment variables, and the SET command.The PL-CFG.INI file is searched for using the following algorithm: If the "PL-CFG.INI" environment variable is defined, then its value is the name of the file; otherwise, "pl-cfg.ini" is the name. If the name of the file includes a path specification, then the file must be located in that directory - no searching will be performed. If the name does not include a path specification, it is searched for first in the current directory, then in the directory that PL-TERM.EXE (or other PicLan utility program) was loaded from, and finally in all of the directories on the DOS PATH.
See the comments in the PL-CFG.INI file for instructions on how to use it to configure the Emulator. Before editing PL-CFG.INI, you should save a backup - it is possible to cause the Emulator to be non-executable if incorrect configuration information is supplied.
If you are looking for maximum performance out of a DSG for transferring large files, the DOS versions are faster than is the Windows version. PL-DSG also has lower DOS memory usage than does PL-TERM.
In order to configure a DSG, you must setup the User= and DosServicesGateway= fields in the PL-CFG.INI file.
If the PL-LOAD command appears to have executed without errors, the next step is to execute a PL-STAT (R) command from TCL in the PIC-LAN account. This command should display the name of the Pick host, at TP field value of 07 (01 is legal as well if you have elected to not start a PicLan SERVER-PROCESS), and a reasonable node address. Below the server list display, you should see a number of driver statistics that can help you pinpoint problems with your installation:
If you system is not communicating at all, this field probably means little. If you are communicating and this field has a high number (more than 1% of the "Receives" field), then this may point to a network cabling problem or other systemic network troubles.
Typically this number should always be zero. If this number is not zero, then it indicates either an IRQ problem with the adapter, or a cable-off situation. Cable-off can also mean that the adapter is configured for the wrong type of interface (eg. TP instead of COAX).
This count indicates the number of connections that were broken because of communications errors. The most common cause is a workstation being powered down without shutting down their PicLan connection first.
A reopen is a particular type of retry. It is tracked for historical reasons, but is probably not a concern with current PicLan releases.
This is the total number of packets that have attempted to have been transmitted.
This is the total number of IPX packets addresses to this system that have been received.
This is the total number of IPX broadcast packets that this system has received
This is the total number of non IPX packets or IPX packets with invalid network addressing received by this system.
If your PL-STAT (R) display shows zero values for all types of receives, this indicates that the network adapter is not receiving any traffic. If the connected network is running any other type of network system (such as NetWare, Windows for Workgroups, or Windows NT), then the Pick system should see at least some traffic. This indicates that the adapter is not functioning. You should check IRQ settings as well as verify that the adapter is compatible with PicLan.
If NetWare is displaying error message once a minute about "router as node xxxxxxxxxxxx is claiming network number xxxxxxxx, should be network xxxxxxxx", this indicates that the network number and/or frame type on the Pick host do not match NetWare. You should change the Pick host so that it's frame type and network number match those of the NetWare segment that you are connected to.
If NetWare is not displaying error messages, you can execute a NetWare console command DISPLAY SERVERS. This command will display all known IPX servers with their names and number of router hops from the NetWare server. The name of the Pick system should be included in the list (this is a good reason not to give the Pick host the same name as another server on the network). If the name is not included, this indicates that the Pick host is not transmitting on the network or is transmitting on a frame type that NetWare is not listening to.
You can also configure your network to include a DOS Services Gateway (even if you have not licensed the DSG option) for the purpose of using the DSG as an advertising server under DOS or Windows. The PL-STAT.EXE command (or the DISPLAY SERVERS command from the NetWare console) should see the DSG system even if there is no Pick host present.
   Goto:  Table of Contents   Index
Chapter:  1 2 3 4 5 6 7 8 9 10 11 12 13 14